
Java Session 3
Color Coding -- Literally Coloring the Code
Session Overview
Java is a computer language, and like each and every other computer programming language, is highly structured. Humans can interchange "Hey, how's it goin?" and "Hi, How are you?" and miscommunication rarely occurs. Even though computer languages are more rigid in what they can understand, we can use that rigidity to our advantage by durably learning the structure early on and implementing that structure in every program we write.
This session centers around the process of identifying and beginning to internalize the structure of the java language which is made up of a handful of core components.:
- Operators
- Method Calls
- Classes / Types
- Method Delcrations
- Identifiers
(Potentially) Interesting Question
What can we learn from our own experiences learning human languages that can help us speak Java?
Learning Objectives
- Mark up Java code using the Technology Rediscovery Java Markup Approach (JMA)
- Begin to internalize the core java language components -- or the Java Grammar, listed in the course overview and described in detail below
- Access class source code via a version control system web graphic user interface (GUI)
Misc Class Notes [up to 20 mins]:
- Session structure, prep, and review process
- Choosing resources: Books and online tutorials: Intro to the Java Jungle
- Office hours and getting help: preferred methods for preferred inquiries
Activity 0: Accessing our course's code base- An introduction to git! "Now way! Git out of here!"
Nearly every group coding endeavor uses some specialized tools to create computer programs collaboratively and together these tools are called version control systems. The most common one these days is a system called git which allows users to create code on their local machine and merge their work with the work of other programmers. We will use this tool on a basic level to retrieve code we'll use during class and for exercises. Eric uses the tool more extensively to "push" the code from his computer up to the git server so students and the public can access it, free of charge.
Link to our class's git repository:
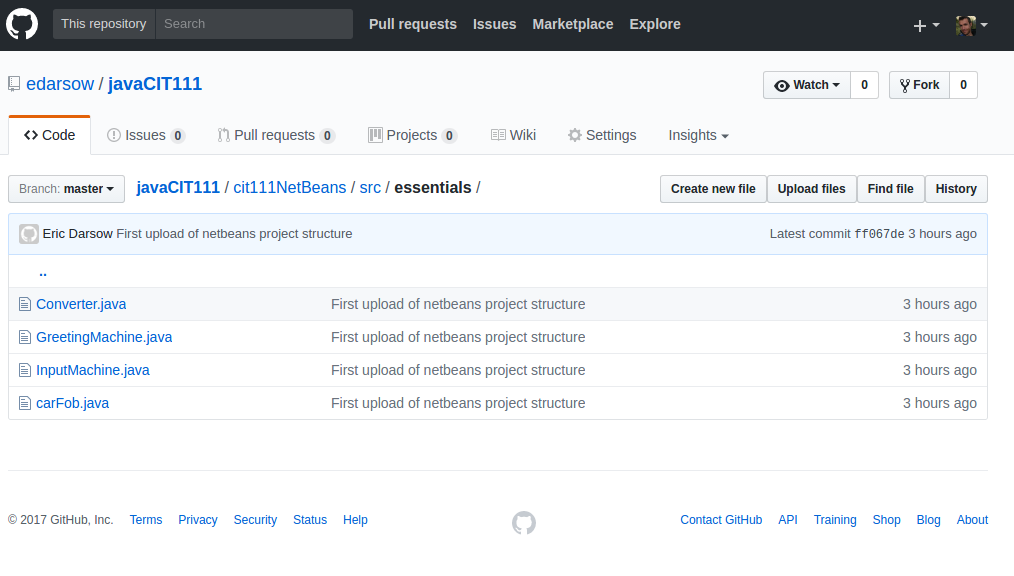
Notice the navigation controls above the code file listings: our code exists inside the /src directory which is created as part of our NetBeans projects. Since this repository is all open source, you can explore all the files in Eric's repository, and his other repositories, too.
For now, you can click on the individual files and view the code in the github's code viewer. You may use it as reference or you can copy and paste the code into a class in Netbeans. See steps in the next activity for loading code from our class repository into netbeans and running it.
Activity 1: Running a class from our course repository in NetBeans
If you would like to run code from our course repository, you'll need to create a proper container to do so from within Netbeans--which is a java file defining a Class with exactly the same name (including exact capitalization) as the class you are copying in from github.
- Open the code file you want to import. Read the code until you read the line declaring a new class:
public class JavaParts{
- Now in netbeans, make sure you are working inside a Java Application project. If you have no projects, create one with file>>new project>>follow prompts. The project name can be anything you want.
- Using the left-hand projects box, navigate to the source packages within the project. If you do not have a package (you'll see a package called default package), create a package with any name (lowercase first letter) by right-clicking on "Source Packages">> new >> Java Package.
- We need to create a .java file that contains a class with exactly the same name as the class you are copying in. In our case, the class name is JavaParts. Create this java class by right clicking your package >> new >> Java Class. Type--or better yet--paste in the class name into the "wizard" and create the class.
- With the new .java created, double click it in the project viewer so it opens in an editor tab. Check to make sure the class it created has the same name as the class in the git repository. Now position your cursor inside the { } for the class.
- In the github browser, select only the lines of code INSIDE the class { } and copy them to the clipboard with control + c. We don't want to move over the class declaration or it's closing brace because NetBeans already created these lines for us.
- Check the pasted in code for errors. If you have an error, check each curly brace to make sure it's opening and closing exactly what you want. If you cannot get it to run, delete everything in the edior with control + a and then backspace. Now copy and paste in the entire contents of the github repository file and check for errors again.
- Test run the class with Run >> Run File
Activity 2: The language learning process [10 mins]
Questions for partner discussion: What human languages have you worked on learning aside from your native language?
What activities did you do to learn that language that were effective? Which do you remember as being the least effective?
Activity 3: First pass with the Java Markup Approach (JMA) [30 mins]
We'll learn the JMA by marking up our class modeling a car remote FOB from sessions 1 and 2. The following activity will involve applying this approach to a new java class. Start by visiting the course's github repository and open up the .java file called CarFob.java
Visit the markup tutorial page and follow its phases, checking your work.
Activity 4: Marking up the HalfLife class [20 mins]
The Chernobyl Disaster Overview Video
Now that we've practiced with JavaParts, let's explore a new class called HalfLife, which is a program for calculating amount of radioactive material that exists after some period of time. We'll follow the phases of the java markup approach (JMA), so reference that page from activity 2 as needed.
- Start by transferring the code for HalfLife.java from our repository on github into your netbeans project. Check activity 0.5 for instructions on this process. Test the code and tinker with the project.
- Either secure a copy of this code from your teacher or print this code off by transferring it into a word processor and sending it to the printer.
- Grab your highlighters and complete the first 2 phases of the markup process.
- Check your work against the solution key and fix any errors you notice
- Then complete the rest of the diagramming and check your work against the key below
Activity 5: Personalizing the HalfLife class [10 mnins]
Now that your HalfLife clas is well understood, review the following possible changes or additions to the code and tackle the challenge.
- Straightforward: Look up the half life of another nuclear element online. This could be plutonium or uranium, etc. Connect whatever you look up to some interesting thing, like the fuel in nuclear submarines, or what we use in nuclear power reactors.
- Intermediate: Create a new method in HalfLife class which can do the calculations of half life for more than one element. Include both element's half life values as constants.
- More complicated: Using a Scanner object and it's nextInt() method, create a system for asking the user which of several possible elements he/she/they want to use in calculating a half life of an element. You can also add user input for determining the intial mass and the time for the decay to occur.
Practice and Extensions
- Go back to the markup guide and review the Oracle documentation linked in that page. Internalize the examples given by the Oracle author.
- Visit the java tutorial set published by Tutorials Point here. Find a fully written java class in one of the tutorial point pages and print it out onto paper. Grab some highlighters and follow the JMA steps on this class. Check work with a friend or mentor.
- Try the more complicated personalization options in Activity 5 -- for folks with some Java background.