[the great and mighty] PostgreSQL database
Databases store organized information. Early databases arranged records pertaining to a specific idea into rows in tables, interlinked to avoid data duplication. Modern databases build on relational systems by flexibly storing arbitrary key:value pairs that are nicely digested by ECMAScript and its related web technologies.
Database ecosystems
Modern databases emerged in the 1970s with the advent of the relational database embodied in Multics --the first commecially available relational database. Today, database technology spans much more than table-based storage schemas to include so-called NOSQL ("not only SQL") databases such as MongoDB which are based on insertion and retrieval of key:value pairs--which integrates extremely well with web and javascript-based platforms.
Reverse engineering databases from query building forms
Exercise Steps
- Review the sample database above of national electronic injuries. On that front page, select a User Affiliation and click "Build Query". Then Run a query or two and see that once you get a national estimate, you can download the flat file showing the actual recorded incidents
- This is an exercise in re-creating possible database tables and their relationships based on the query options provided and the output the query generates. With a partner, run a few queries about topics of interest to you related to electronic accidents.
- Study the ouput carefully and begin sketching a possible table structure that might exist inside the relational database for generating the results that you observed. Notice that we are interested in what kind of "utility" or "lookup" tables that might provide fixed categories, like a Product Group table that provides entries for the drop-down box called Product Group.
- Compare your tables with those in the class and discuss how they might be keyed, what data types might be used, and why this structure allows for normalization (i.e. not duplicating data anywhere).
saveExternal resource links
wb_incandescentSoftware install and workspace setup
Carry out the following tasks
- Install PostgreSQL database on a computer on which you have admin rights
- Test your install by navigating to a command prompt and testing by issuing an empty command: psql which is the name of the postgres daemon on windows and *.nix systems (Linux, OSX, and Unix)
Configuring your PostgreSQL install
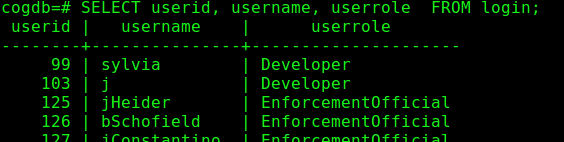
The postgreSQL access system is based on roles which are granted access to various database objects, such as a database itself, or an individual table or view. A user in the postgres system is synonymous with a role in that users and roles are both granted powers to carry out various database related tasks.
- Postgres is built in with a super user called postgres. You can login as postgres with the following command on Windows
psql -U postgres
- Once logged into the postgres prompt as the postgres user, you can run the following commands to create a database in which you can create tables, etc.
CREATE USER xxxxx WITH PASSWORD 'xxxxxx';
For Linux users"
CREATE DATABASE xxxx ENCODING 'UTF8' LC_COLLATE = 'en_US.UTF-8' LC_CTYPE = 'en_US.UTF-8';
For windows users, just create the database without any of the above parameters:
CREATE DATABASE xxxx;
GRANT ALL PRIVILEGES ON DATABASE xxx to xxx;
With this framework in place, you can then logout of your postgres prompt with \q
Now, login to the newly created database with your newly created user and begin running data definition commands, such as CREATE TABLE, ETC.:
psql -d xxx -U xxxxx
Create your first tables
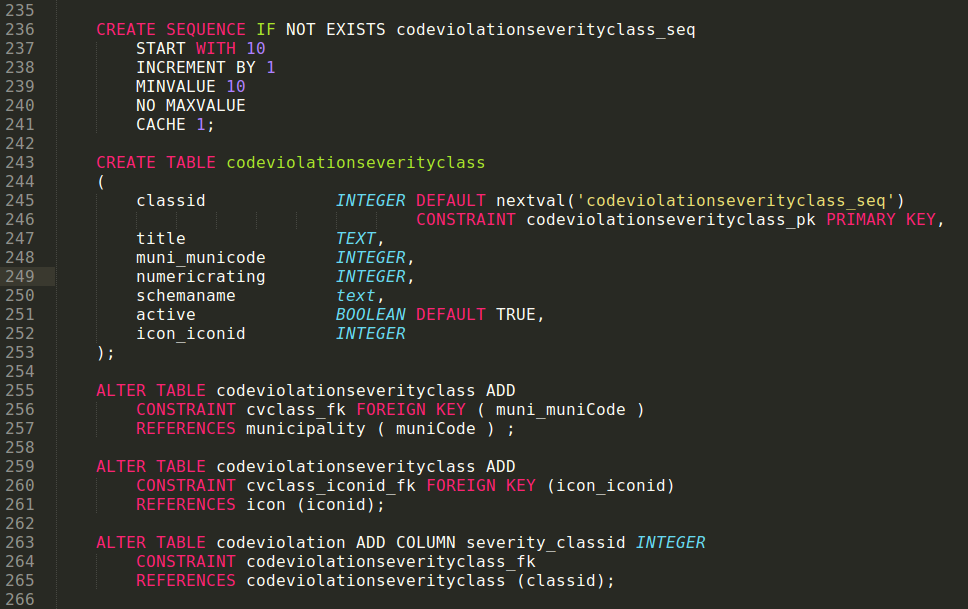
Creating tables in PostgreSQL involves declaring the columns and their respective data types. The documentation on PostgreSQL for creating tables is straightforward. You can also consult the complete reference on the CREATE TABLE command in SQL.
Copying into postgreSQL tables from text files
The COPY FROM command in PostgreSQL allows you to systematically read data into database tables from flat files. The tool documentation is dense, but worth a close read.
- Navigate to the Western PA Regional Data Center's Allegheny County Jail Census page and download one month of data for testing.
- Save the flat file into a known location on your hard drive. Navigate your command prompt to this location and use dir to ensure that the flat file is in the same location as your command prompt. This will make reading in the flat file into your postgreSQL table much easier since file locations will not be tricky.
- Carefully read the syntax for the COPY ... FROM command.
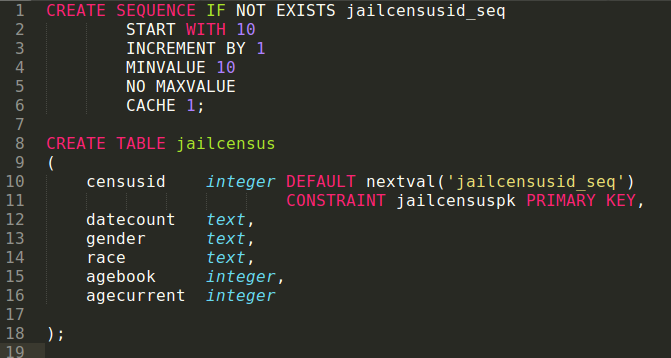
- Create a table for holding the census data as shown below.
Creating a table to hold file from a CSV
- Naviate into your database via the command prompt so you are in the interactive terminal for postgres. This will be something like psql -d xxxx.
- Compose the following command in a separate text file in case you need to try it a few times.
\copy jailcensus (datecount, gender, race, agebook, agecurrent) FROM '/home/sylvia/teaching/data/jail.csv' WITH (FORMAT CSV, DELIMITER ',', HEADER TRUE);
Note that we used the \copy command instead of COPY to allow us to avoid issues with super user rights. \copy functions just like COPY except we don't need to be the postgres user.
- When complete, you should be able to query the table and see the data property read into the system.
- Use an aggregate function to compute the average age of inmates at the time of booking on each day of the census.
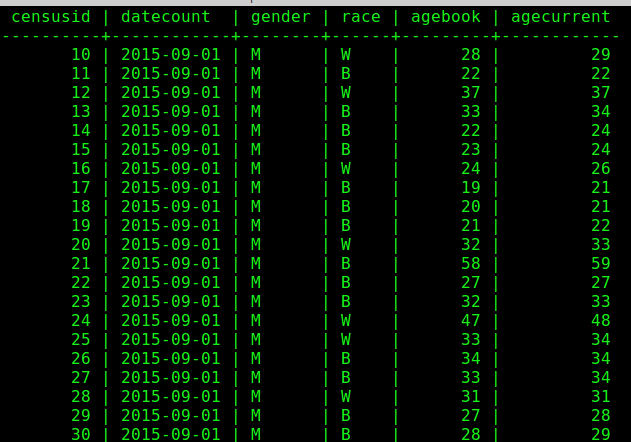
Successful reading in of data from the flat file of jail census data

Data copied into the jailcensus table from the \copy command
Query practice
Attempt to write SQL queries to answer the following questions about the Allegheny County Jail using the jail census data you imported into your first postgreSQL database in previous sections
How many days of data are in your dataset?
How many inmates were counted each day of record in the database?
How many inmates were counted each day of record whose agebooked was less than agecurrent?
What is the ratio of Black to White each day of record in the database?
What is the avergae age of inmates on each day counted in the census?
Postgres project outline steps
We are going to work through the process of creating and exploring multi-table data by first working with flat files of US census and ACS data. Then, once we feel good about the census data detached from its spatial components, we'll enable the PostGIS extension in PostgreSQL and being querying and viewing the data spatially. Use the following steps as a guide for assembling multiple tables of data from the US Census to create background data for a spatial inquiry of an area of your choosing.
- Create a new file called your work process log where you can document the steps you take in this process--this is for you in a year, and for others who might want to reproduce or validate or build on your work.
- Choose a region of the country, such as a half of a US state, and develop an inquiry question related to human life in this area that the American Community Survey can shed light on.
- Develop a social inquiry question to investigate related to how one or a set of indicators have changed through time. We can pull ACS data from many different years, some of which we can go back as far as 20 years.
- Locate 2-4 tables in american factfinder related to your pattern of interest. Download that table data at the census tract level
- Organize and trim these files in a spreadsheet so that they can be read into your database with the \copy command nicely. This will require writing scripts to create tables to match the columns of interest in your mini-project.
-
- Boil down the two header rows into a single one
- All column names should be in lowercase characters, no spaces, and do not start with a number
- Remove all unwanted columns, focusing in on about 6-10 per us census table
- Ensure that you preserve both (or all) of the identifer columns, called geoid, id, etc.
- Conduct a basic analysis of the change in indicator over time using formulas inputted into your SQL queries.
- With flat file analysis done, you're ready to visualize the data spatially: follow instructions in the next section to enable postgis extensions in your database in postgres and read in your spatial data
sub-module h: PostGIS and QGIS!
With the postgreSQL database up and running, and the qgis modules under the belt, we can enable some schnazzy extensions to posgreSQL which allows for storage and manipulation of spatial data right alongside regular tabular data! Once we plug qgis into our fancy database tables, we can drop layers into onto a qgis whose data resides not in ordinary, disconnected operating system files, but rather in structured tables in our database!
objective |
Add spatial data to a map project in qgis whose data source is a postgis-enabled postgreSQL database created by reading in an ESRI® shapefile with the shp2pgsql command line tool |
contents |
Section 0: Software and external resources
|
software and resources |
|
system pre-reqs |
|
skill pre-reqs |
Undertaking this sub-module is intended for users who are able to
|
Section 1: Enabling the postgis extension
postgis is the name of an extension module to the postgresql database which is itself a collection of tools which together allow users to:
- Store spatial data--both vector and raster types--in database table columns and manipulate their values as we would any other "normal" postgres data type like TEXT or INTEGER.
- Transfer, package, and convert spatial data as it makes its way into and out of the database tables
The following sequence assumes you have a database whose name you know and you can connect to in pgadmin
-
Open a terminal window in Ubuntu linux and update your packages, carefully reading any output and responding thoughtfully:
sudo apt update
-
Install the postgis extension package and its dependencies by saying:
sudo apt-get install postgis
-
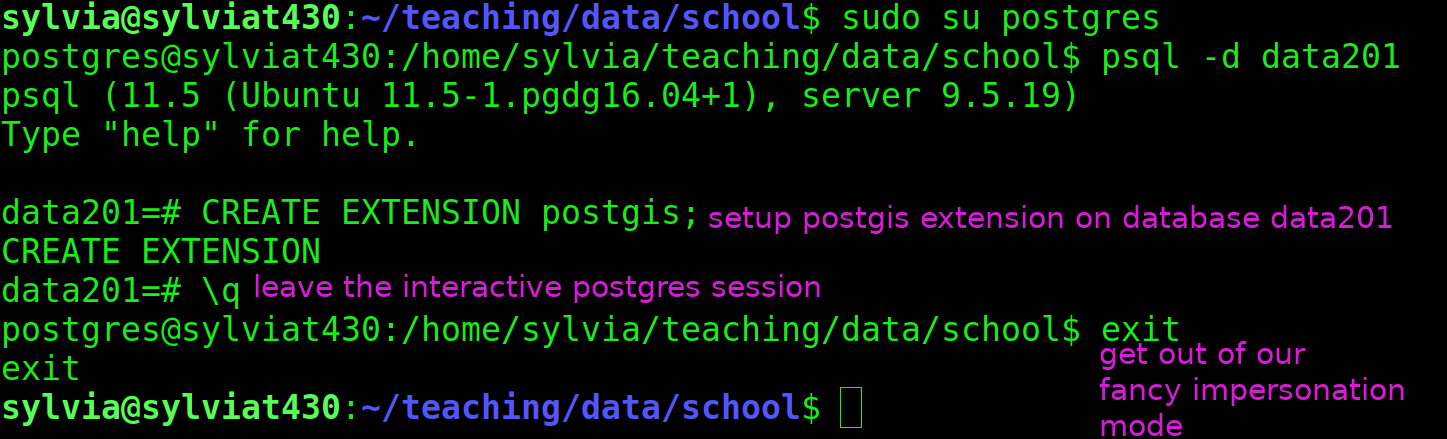
If all goes well, no error messages will be on the screen. We're now able to enable this extension in our desired database(s). This change requires administrative rights on your database, which your linux username role probably doesn't have. But the all-powerful postgres user does, and this user is automatically created when you authorized the install of the postgres database.
To become the postgres user, we use the su
 tool which allows us to interact with the operating system as if we were a user that is not our current login user. Such identity-shifting powers are only allowed to so-called super users, so we must preface our request with sudo
sudo su postgres
You'll notice that if this command is successful, the prompt on our terminal has changed to read postgres@computer: {some dir path}$
Then you can talk to the postgres database through the psql program which needs to know which database we wish to tinker with. We tell it which database with the -d flag.
psql -d {your_database_name}
The command worked if we are in an interactive exchange with postgres shown by a new terminal prompt that is just your database name and the # symbol.
-
Ask postgres to wire up our newly installed postgis extension with
CREATE EXTENSION postgis;
If all is well, postgres will say CREATE EXTENSION back to you. Exit out of the interactive terminal with a \q and stop impersonating postgres with a simple exit command. You are now operating the terminal as your original login user. See image h1 below for a screen snip.
Section 2: Procuring ESRI® shapefile data
Gather up spatial data that we can send into Postgres!
-
Procure spatial data of your choosing to read into the database. The author is reading in all of the US Census tracts in Allegheny County, Pennsylvania retrieved from the TIGER spatial database hosted by the US Census.
-
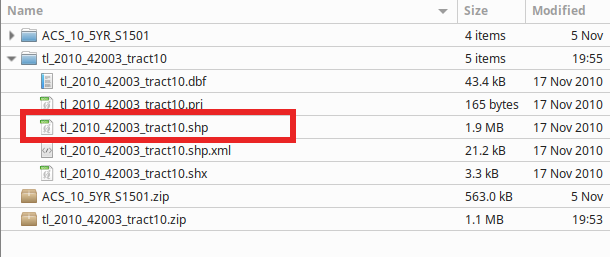
ESRI Shapefile data spans many individual files and will be extracted from archives (i.e. "zipped" directories) so stop and create a sensible place to put the uncompressed files, preferably within a master project directory and either in dedicated directories for each ESRI Shapefile layer or a directory for all ESRI Shapefile data that's separate from your work log and qgis files, etc.
- Extract all zipped directories such that you can see five or more individual files that together make up the entire ESRI Shapefile. See image f2 below.
-
Use your bash terminal skills and the cd command to navigate into the directory containing the expanded ESRI shapefile data such that when you run the command
ls -al
you can see a listing of a set of files with strange extensions, one of which must end in .shp
-
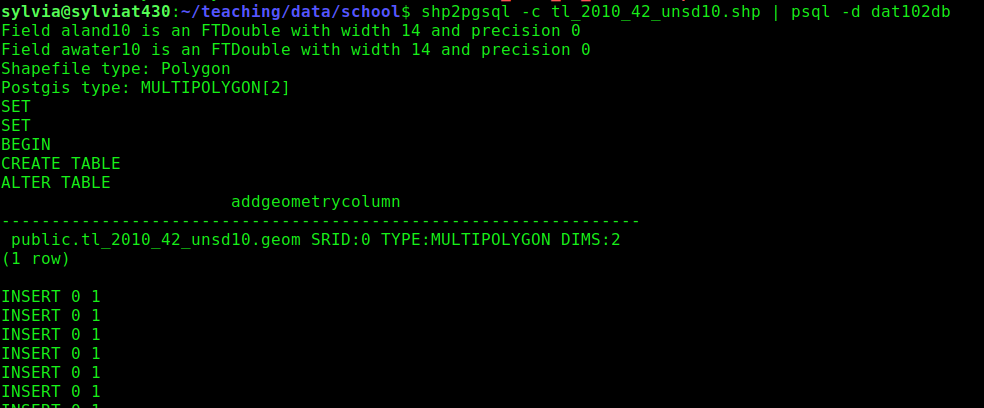
Use the shp2pgsql tool which knows how to patch together the 5+ files in ESRI's proprietary spatial data format and extract all encoded geometrical features and their associated attributes. It will generate SQL code which inserts the features it finds into a database table.
We use the magical character called a pipe (on most keyboards, it lives in the shift position on the key above Enter) to direct the SQL code that shp2pgsql generates into the database on which we enabled the postgis extension:
shp2pgsql -c tl_2010_42_unsd10.shp | psql -d data201
Or more generally:
shp2pgsql -c {.shp_file_name} | psql -d {name_of_database_with_postgis}
If you get an error, try running the command on either side of the | independently and seeing if it behaves as expected. shp2pgsql -c tl_2010_42_unsd10.shp by itself on the author's computer outputs gobs and gobs of pages of hexadecimal digits representing spatial data.
Correct output will look like the author's output in image f3 belw: inserts will be successfully made into the database table that
Section 3: Reading in spatial data with shp2pgsql
Section 4: Connecting postgreSQL and qgis
Section 5: Packaging analytic queries in database views
sudo apt install postgis sudo su postgres psql -d [your database name} ENABLE EXTENSION postgis;

Reading in spatial data into postgres
PostGIS documentation- Start by securing an ESRI shapefile of spatial data (any kind) and save it to a known location on your drive.
- For many, this will be through TIGER shapefile repo maintained by the US Census Bureau
- With your shapefile downloaded and extracted, we can build our command to read in the entire shapefile into a table which
shp2pgsql -c tl_2010_42003_tract10.shp dat102db - With QGIS open, navigate to layers then data source manager then
